Deliverables Repository Set Up
Set up the GitHub repository that we will be using for all of the code-based in-class activities and assignments over the course of the semester.
Submission
Push your completed deliverable to your GitHub deliverable repository.
Due: Wed Sept 13, 2023
GitHub
open_in_newSample Repo
In this assignment, we will be setting up a GitHub repository that we will be using to host all of the code for our In-Class Activities and Assignments. Using this single repository will make it easier for you to ensure your code is safe and backed up and will also make it really easy to submit your work and get it reviewed by the professor.
Please Note
The code for the two Projects this semester will not be included in this repository. Each project will have its own separate repository.
# Instructions
Need more help?
Check out Steve's playlist (opens new window) on using GitHub.
# Step 1
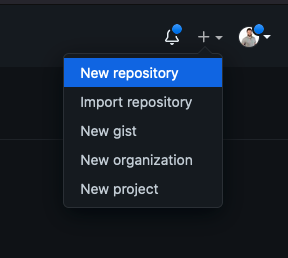
Navigate to GitHub (opens new window), log in, and then select New repository on the top right of the navbar.
# Step 2
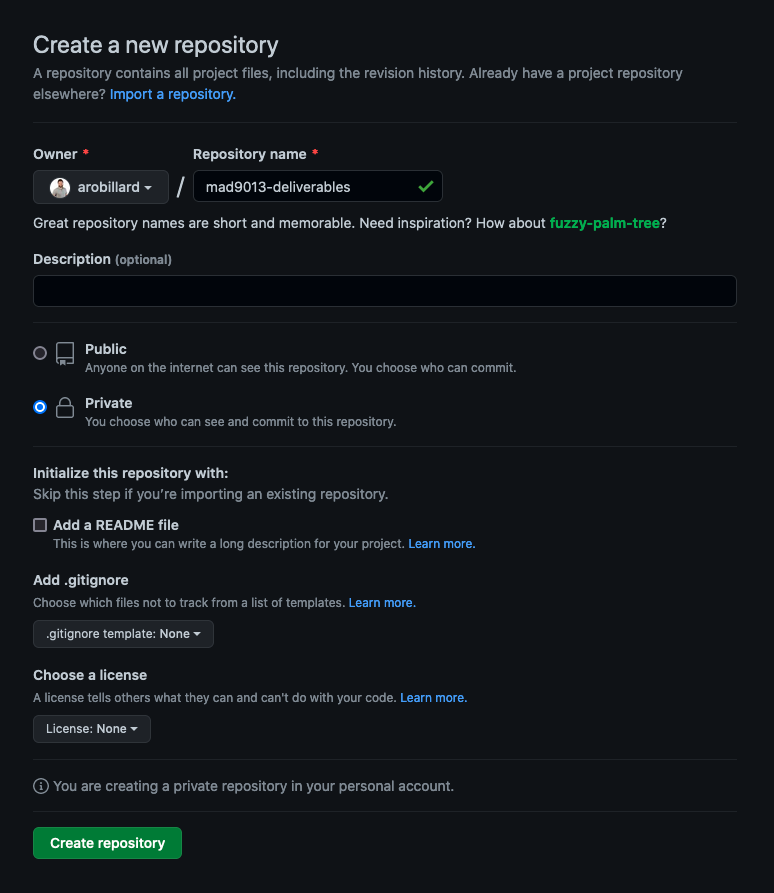
Name your repository mad9013-deliverables, set the visibility to Private, and then leave the rest of the default settings as is. Make sure that the Add a README file is not selected. Then hit the Create repository button.
You should now have a new empty repository that looks something like this:
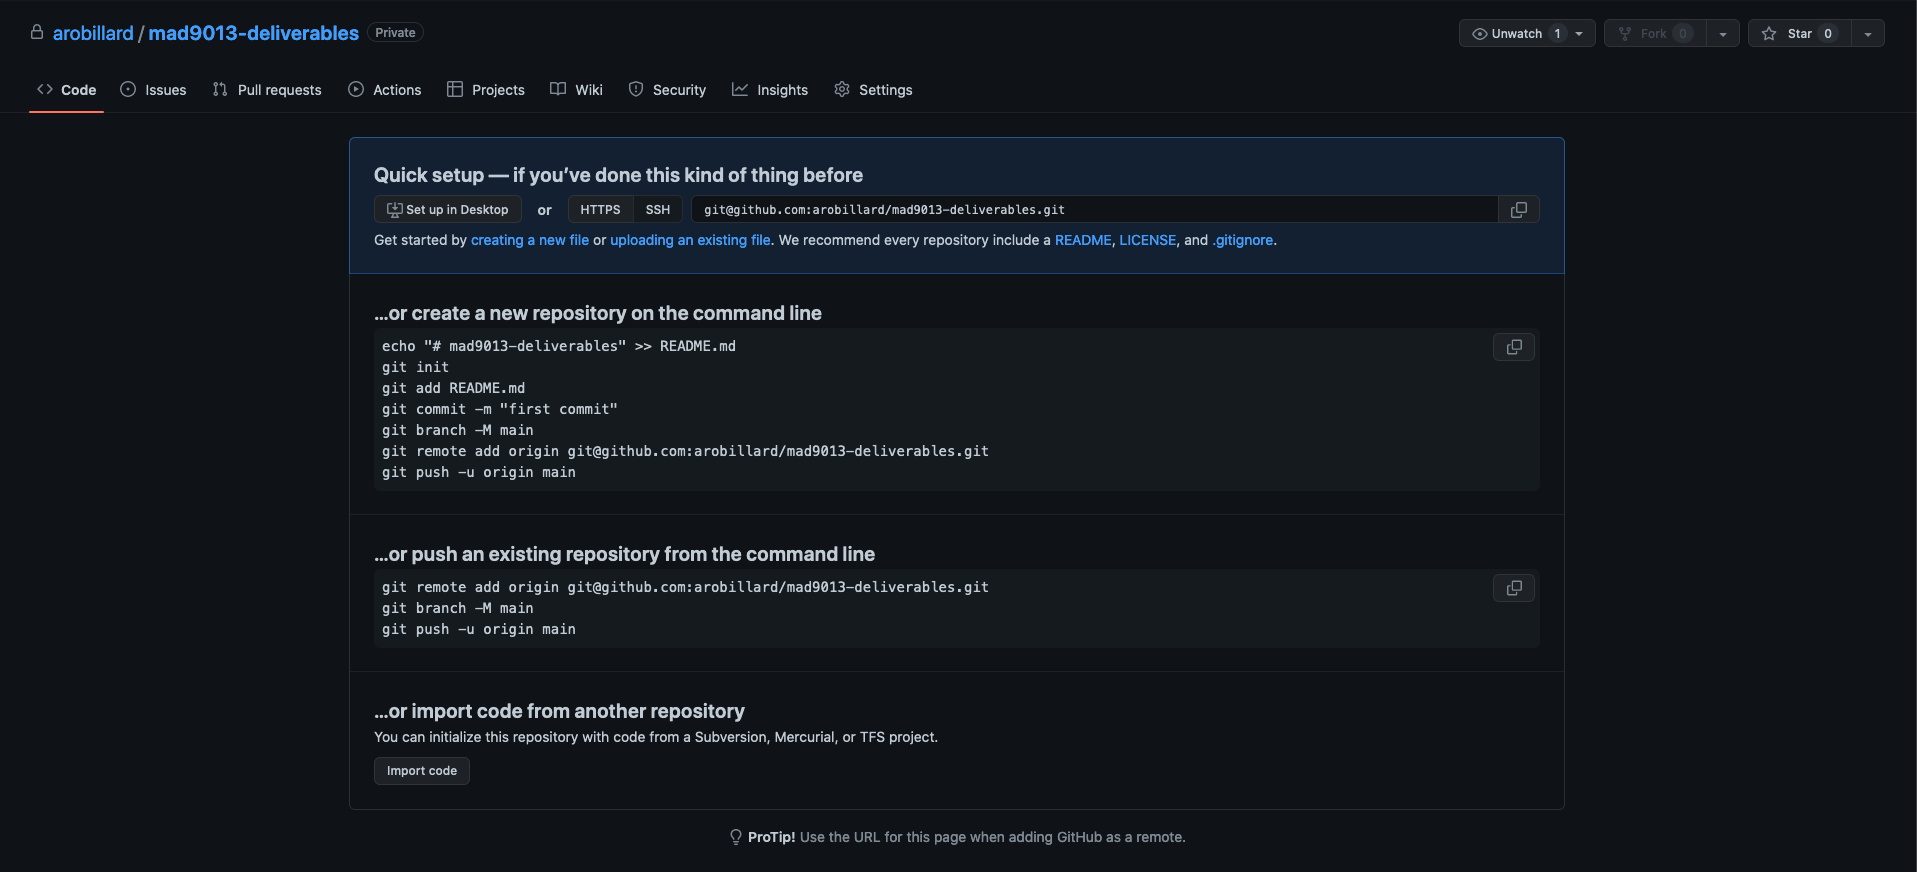
Double check that it's private!
In the top left corner you should see your username and the name of the repository. To the right of that it should say Private, which confirms that the repository is set to private. If you do not see this, head to the Settings tab and scroll all the way to the bottom of the General section to find the Change repository visibility option in the Danger Zone
# Step 3
In Finder create a mad9013 folder for all of your work this semester. Inside of that, create a mad9013-deliverables folder. This folder will be our git repository that we will sync with GitHub.
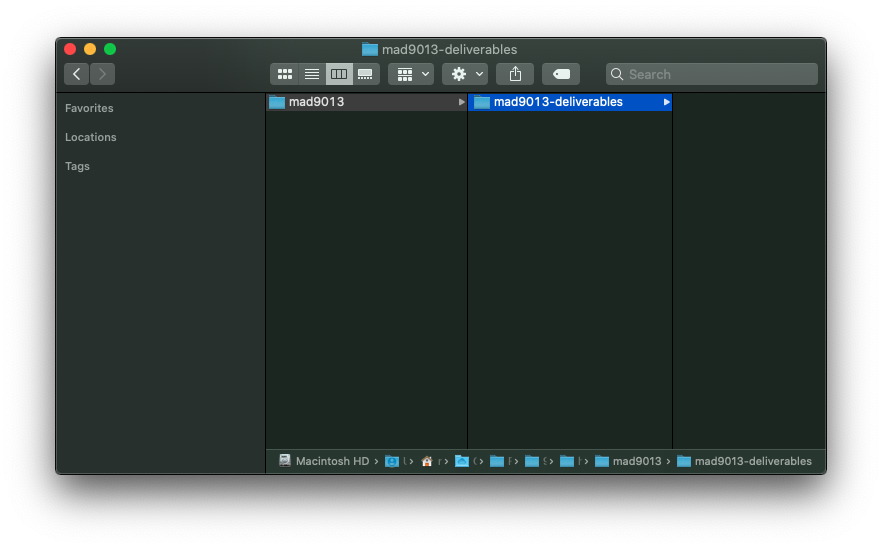
Open that folder in VS Code by either dragging the folder down to the VS Code icon in your dock, or by opening VS Code and going to File > Open Folder....
# Step 4
Let's add a README.md file. This is a special file that, when included in the root of our GitHub repository, will be displayed when we visit the GitHub repository page. It's generally used as an introduction and documentation for the repository. In our case, we are going to use it to store some base info about ourselves.
The file is written in Markdown (.md), which is a lightweight markup language that is great for creating basic text documents. We aren't going to dive into Markdown much in this course, but if you want to learn more, check out this Markdown Getting Started guide (opens new window).
In your README.md file, you should include the following:
- your name as a heading (with the
#character) - student email
- student number
- a profile photo (we'll add this in Step 5)
This is what the README.md file should look like so far without the image.
# Adam Robillard

Student Email: robilla@algonquincollege.com

Student Number: 123 456 789
2
3
4
5
# Step 5
Let's add a profile image! Please find and use clear image of yourself that can be used to help identify you. This is helpful for the professor to keep track of whose repository this is and to learn everyone's names.
First we need to add the image into our repository folder. Copy paste your image into the root of your git folder. Rename the image file to something simple like your-name-headshot.jpg or similar. They key is to keep the name short, clear, and must use all lowercase and dashes. For more information on file naming, see the Naming Conventions info page.
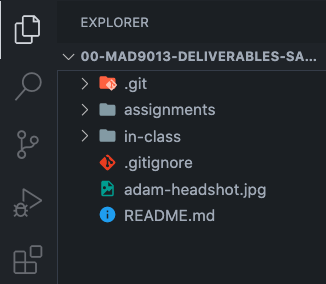
Let's add the Markdown for the image. The syntax is . More info on the image syntax here (opens new window).
# Adam Robillard
Student Email: robilla@algonquincollege.com
Student Number: 123 456 789

2
3
4
5
6
7
File Paths
Take a look at the image url above. That is what's called a relative path. Which means the url provides directions to find the image from the current file we are in, README.md, to where the image is. The . means start in the folder I am in, then we tell it to look in the images folder, and then to find the adam-headshot.jpg file.
We'll discuss more about urls and file paths over the course of the semester. If you want to learn more, check out the MDN What is a URL guide (opens new window).
# Step 6
Add a .gitignore file in the root of your project folder.

In this file we can list files or directories that we do not want to include as part of our git tracking and that won't get uploaded to GitHub. This can be useful to exclude unnecessary files that create annoying conflicts (such as the .DS_Store file that Finder auto-generates) or other personal files you may create that don't need to be included.
For now, all your .gitignore file should include is the following:
.DS_Store
# Step 7
Let's turn our folder into a git repository. For more info, visit the git documentation (opens new window).
Open up the Terminal inside of VS Code with the keyboard shortcut control + ~ or by going to Terminal > New Terminal.
Initialize the git repository by using the following command:
git init
Next, let's add all of our files so that they are tracked, included in our commit, and uploaded to our repository.
git add -A
You could choose to add specific files or folder instead, but the above command will add everything in one quick command.
Next let's commit these files to our repo. A commit is a snapshot or record of our code. As we make changes we can create more commits in the future to both back up our code and keep a record of the changes. We can then view older commits to see previous versions of the code, which can be helpful when making changes and debugging.
Each commit should include a clear commit message that describes what changes are made in the commit. Here is what the commit should look like for our initial set up so far:
git commit -m "Set up deliverables repository"
Heads up!
Using clear commit messages is going to be very important throughout the semester. I will be tracking which in-class activities and assignments you have completed by checking your repo's commits. Each deliverable will have a specific commit message you must use when it is completed to inform me that the work is done. I will not mark the deliverable until I see that commit and I will use the time stamp from the commit to determine if deliverables are submitted on time.
The specific commit message will be listed on the deliverable page.
# Step 8
We now have an online GitHub repository and a local git repository with our files. Let's connect those together and upload our files.
On our GitHub repository page, there are some options for setting up our repo. We want to use the …or push an existing repository from the command line option as seen below.

Copy the code from your repository into the terminal. Do not copy the code you see in this image. That will try and connect it to my repo, not yours.
The first line connects your local repo to the GitHub repo. The second line sets the branch that all the code will be stored on. The third line uploads the code to GitHub.
Once the terminal is done running the code. Refresh your browser. You should now see your code uploaded into the repo.
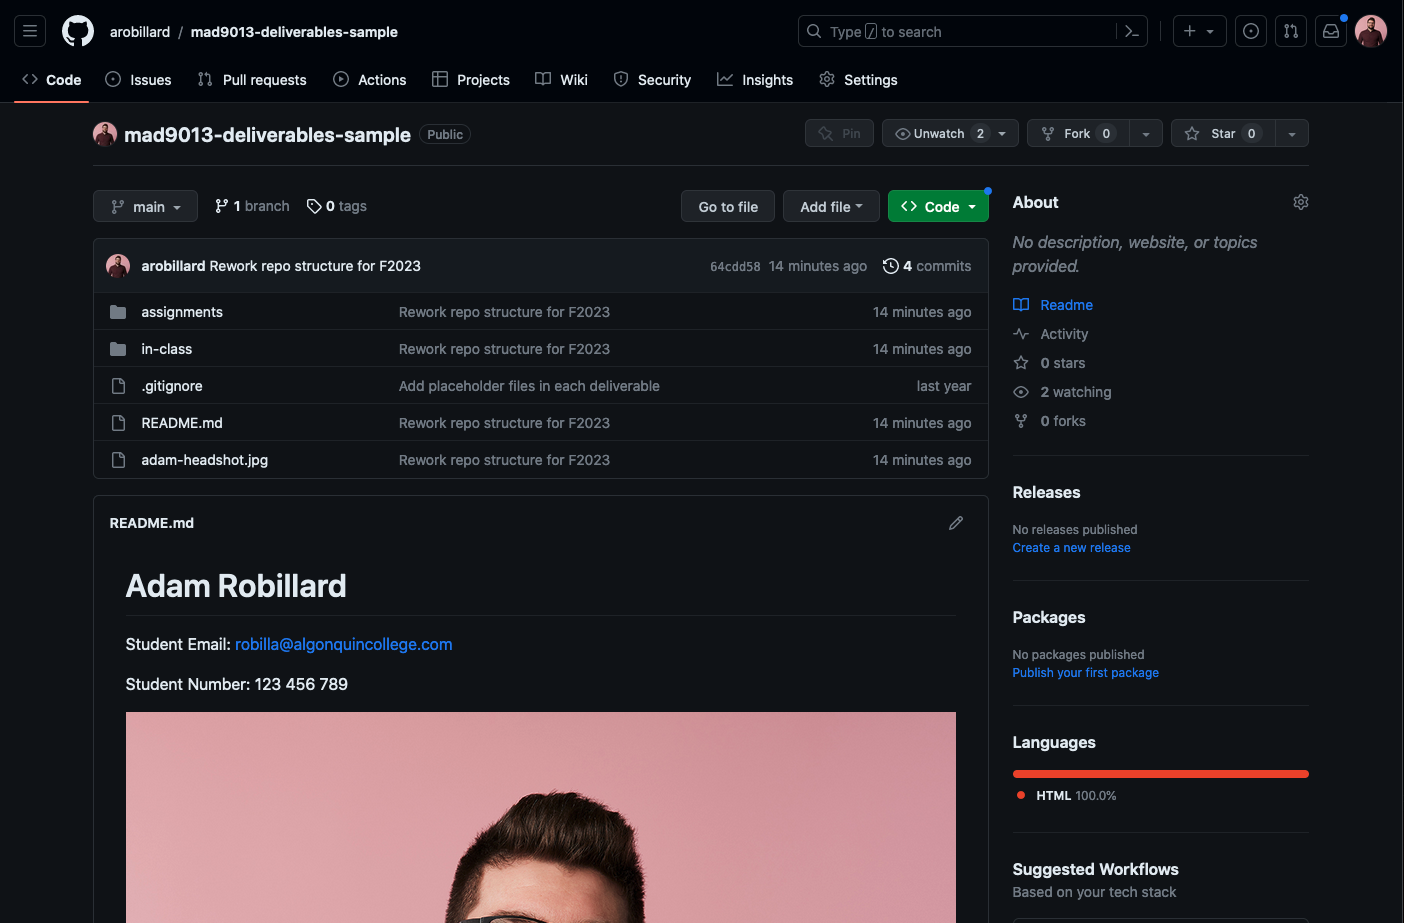
If you don't see your code, look in your terminal for any errors.
# Step 9
The final step is to invite the professor and PAs as collaborators to the repo. This will allow us to view your private repository. If we can't see your repository, we can't see it to provide feedback and mark it.
To add collaborators, go to the repository Settings tab, then to Collaborators. Click Add people and search for us via our GitHub usernames.
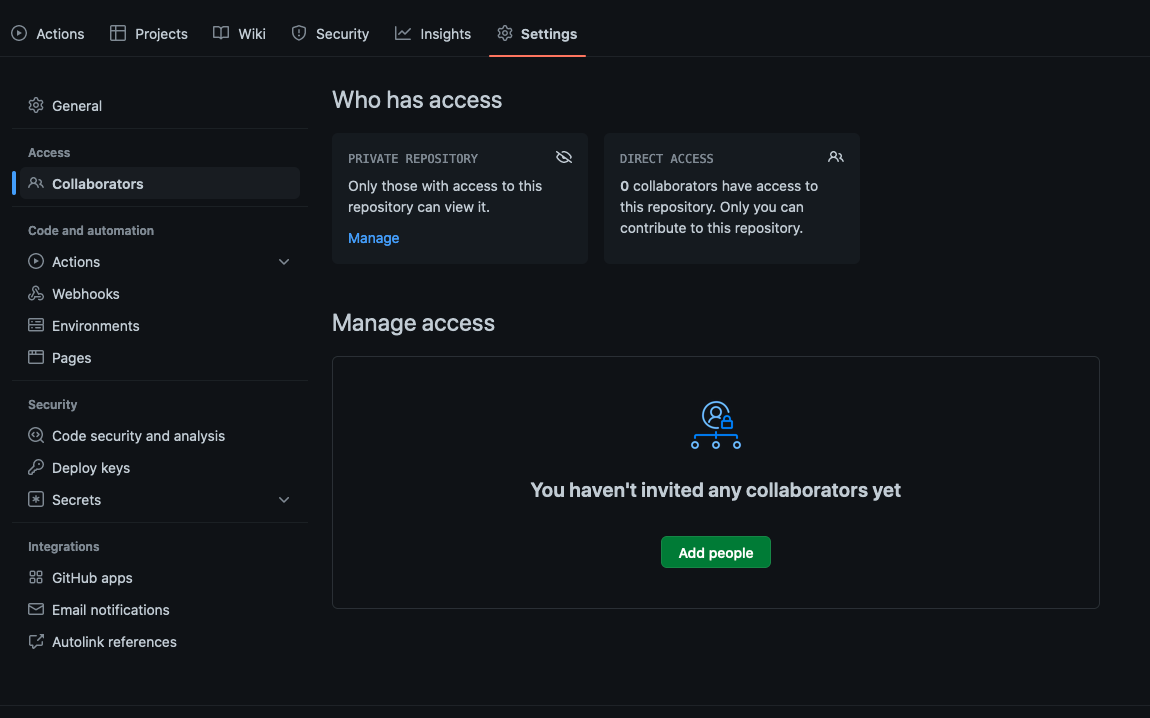
Please add Professor Adam and whichever PAs you are connected to through your labs & class times.
| Name | GitHub Username |
|---|---|
| Professor Adam | arobillard |
| PA Luciano | saav0004 |
| PA Eduardo | sous0049 |
| PA Anqi Lin | Angi-lin |
| PA Vincent | chev0100 |
# Hand In
To hand in this assignment, you must invite me, Professor Adam (GitHub username: arobillard), as a collaborator. You must also submit a link to your GitHub repository via BrightSpace.